Documentation
Features
Supported Zendesk Features
- Zendesk Chat
- Zendesk Support
- Zendesk Help Center
- Zendesk Analytics
Installation
Module available through the npm registry. It can be installed using the npm or yarn command line tool.
# Yarn (Recommended)
yarn add @idopterlabs/rn-zendesk
# NPM
npm install @idopterlabs/rn-zendesk --save
Settings Zendesk
Configuring Zendesk to work with @idopterlabs/rn-zendesk.
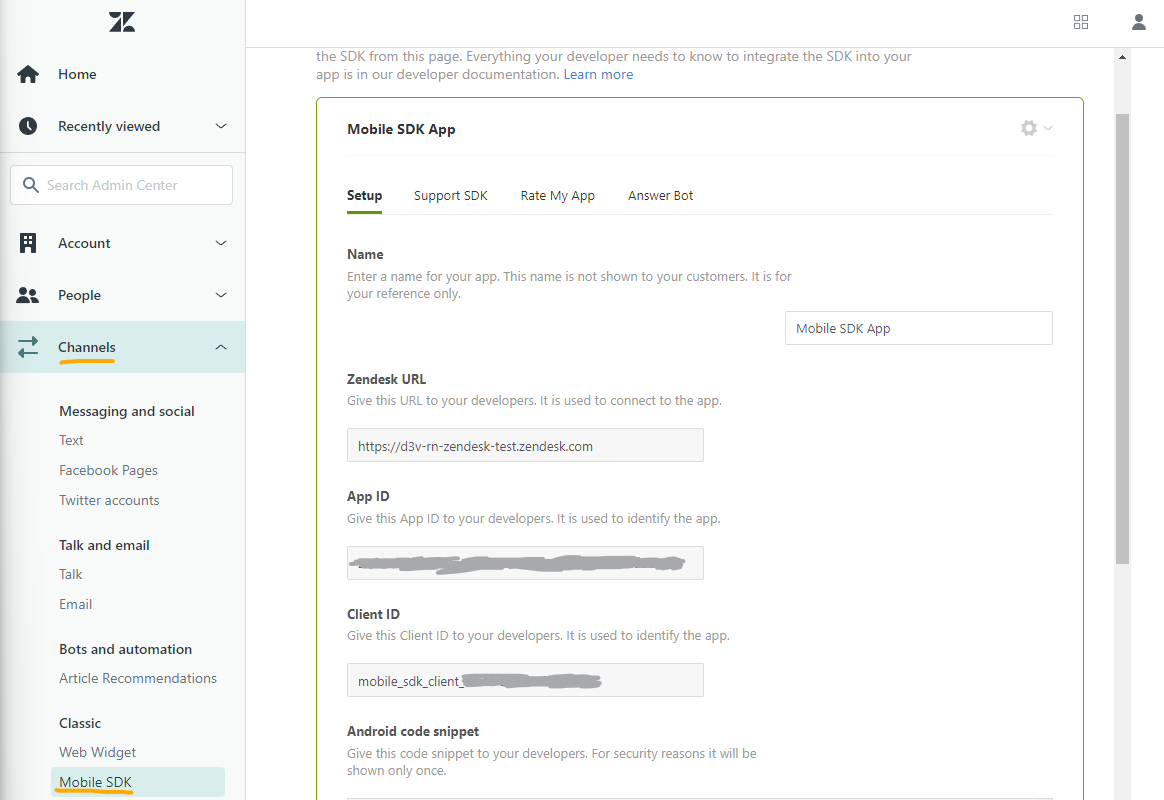
First create an access for your app in Admin Panel >> Channels >> Mobile SDK >> Add App and copy access credentials:

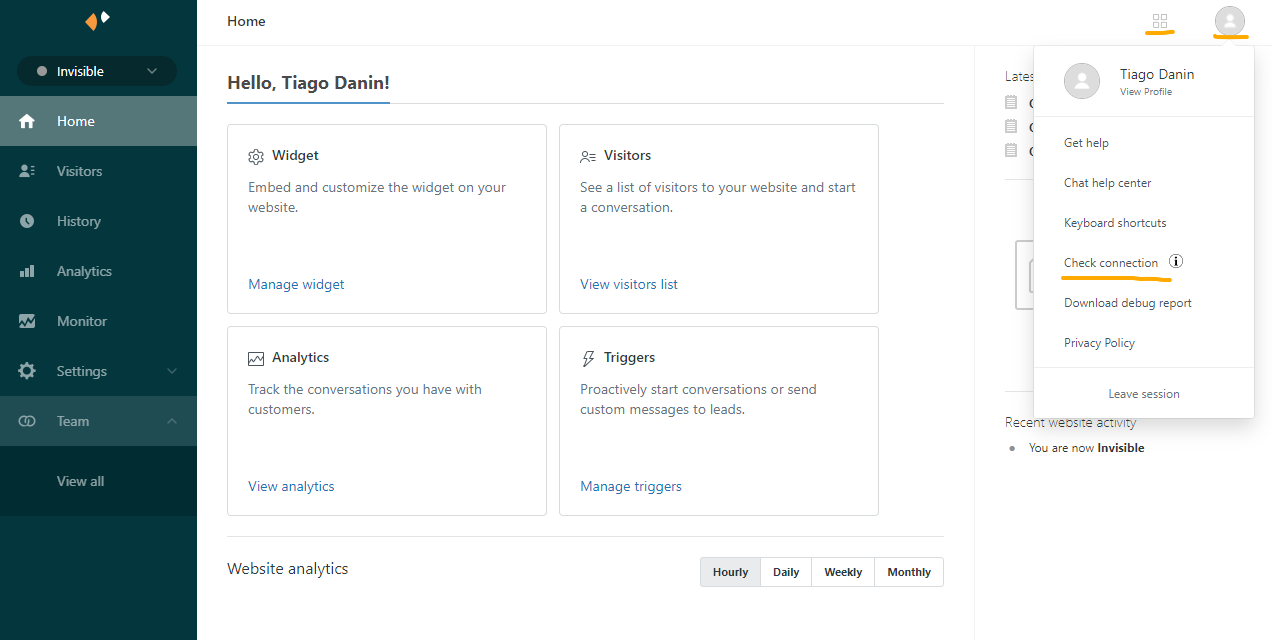
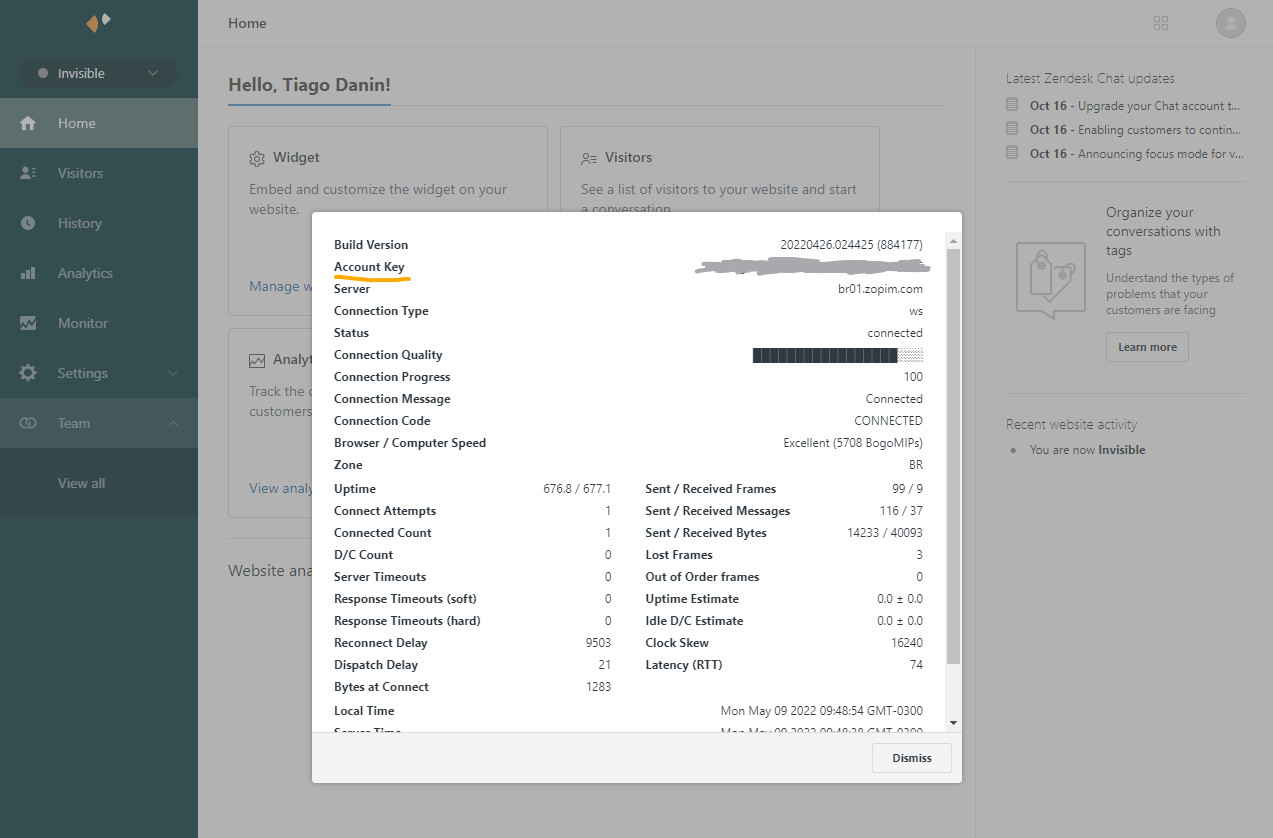
You need to get the account key in Admin Panel >> Zendesk Products (Button found at top right) >> Chat >> Profile Picture >> Check connection:


Using the SDK
First you must obtain the access settings and set via .init(...). After that you can use the zendesk features.
Zendesk Chat
.startChat(...): Open the chat
Zendesk Support
.startTicket(): Open the ticket form.showTicketList(): Open the page with all user tickets
Zendesk Help Center
.showHelpCenter(): Open the help center
Zendesk Analytics
.setVisitorInfo(...): Save information about who is using the app
Style customization
Android
You must set up in your app's Android Manifest (android/src/main/AndroidManifest.xml) the activities with the desired style:
<manifest xmlns:android="http://schemas.android.com/apk/res/android"
  xmlns:tools="http://schemas.android.com/tools"
  package="com.example">

  <application
    android:name=".MainApplication"
    android:icon="@mipmap/ic_launcher"
    android:label="@string/app_name">

    <activity
      android:name=".MainActivity"
      android:configChanges="keyboard|keyboardHidden|orientation|screenSize|uiMode"
      android:exported="true"
      android:label="@string/app_name"
      android:launchMode="singleTask"
      android:windowSoftInputMode="adjustResize">
      <intent-filter>
        <action android:name="android.intent.action.MAIN" />
        <category android:name="android.intent.category.LAUNCHER" />
      </intent-filter>
    </activity>

    <!-- ... -->

+    <activity
+      android:name="zendesk.support.guide.HelpCenterActivity"
+      android:theme="@style/ZendeskActivityTheme" />
+
+    <activity
+      android:name="zendesk.support.guide.ViewArticleActivity"
+      android:theme="@style/ZendeskActivityTheme" />
+
+    <activity
+      android:name="zendesk.support.request.RequestActivity"
+      android:theme="@style/ZendeskActivityTheme" />
+
+    <activity
+      android:name="zendesk.support.requestlist.RequestListActivity"
+      android:theme="@style/ZendeskActivityTheme" />
+
+    <activity
+      android:name="zendesk.messaging.MessagingActivity"
+      android:theme="@style/ZendeskActivityTheme" />
  </application>
</manifest>
And create the style in android/src/main/res/values/styles.xml:
<resources xmlns:tools="http://schemas.android.com/tools">
    <!-- ... -->

+    <style name="ZendeskActivityTheme" parent="ZendeskSdkTheme.Light">
+        <item name="android:windowBackground">@color/windowBackground</item>
+        <item name="android:textColor">@color/secondaryTextColor</item>
+        <item name="android:textColorPrimary">@color/secondaryTextColor</item>
+        <item name="android:statusBarColor">@color/primaryDarkColor</item>
+        <item name="colorPrimary">@color/primaryColor</item>
+        <item name="colorPrimaryDark">@color/primaryDarkColor</item>
+        <item name="colorAccent">@color/secondaryColor</item>
+        <item name="android:windowLightStatusBar" tools:targetApi="m">false</item>
+    </style>
</resources>
iOS
On iOS set the preferred color via the method .setPrimaryColor(...)